More accurate warpage analysis - Consideration of the cooling behavior during the mold opening time
ESPECIALLY FOR OUR USERS
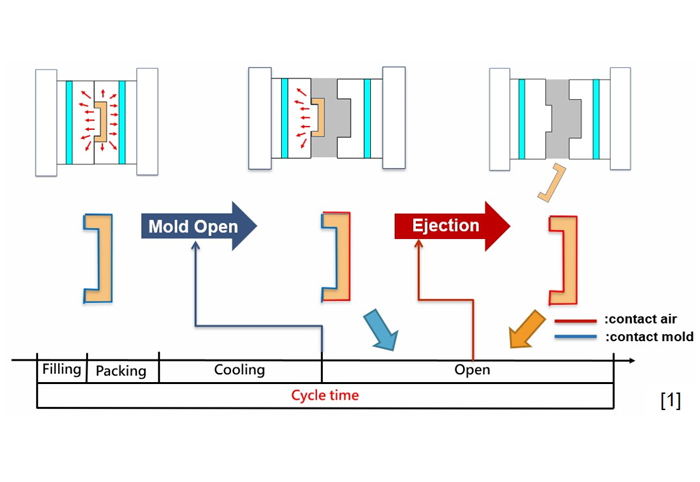
The injection molding process of plastic components is divided into filling phase, cooling phase and auxiliary times, such as mold opening time, demolding time, etc. During the mold opening time, different heat transfers act on the molded part, as it comes into contact with both the mold and the ambient air. In the case of long mold opening times, for example when the article is removed manually, it is essential to take this effect into account for further analysis steps. Here Moldex3D Studio 2021 offers the possibility to evaluate the influence of the heat transfer difference on the warpage behavior in more detail.
The cooling behavior of injection molded plastic parts has a significant influence on the part deformation caused by shrinkage and warpage. During the injection, packing and residual cooling phases, heat transfer between the plastic and mold steel prevails over the entire molded part surface. Once the residual cooling time has been reached and the molded part is dimensionally stable, the mold is opened. In most cases, the molded part remains on the core side or closing side of the mold and is demolded by means of an ejection system after completion of the opening stroke. During the process steps "opening the mold" and "reaching the opening stroke", the molded part passes through different heat transfers. On the closing side of the mold, there is a "plastic to mold steel" heat transfer; on the remaining part surface, there is a "plastic to air" heat transfer. On the "plastic and mold steel" contact side, a higher heat flow is thus transported out of the molded part. This shifts the temperature gradient across the wall thickness of the molded part and influences the deformation behavior caused by shrinkage and warpage.
With simulation-based analysis of this behavior, it is possible to estimate in advance how the deformation of the molded part will be pronounced at different mold opening times. In Moldex3D Studio 2021, this can be done by modeling a simplified mold consisting of one or more fixed as well as movable mold plates. The non-matching option, i.e. the contact surfaces of the individual model meshes of the components do not match, is also supported in this simulation variant. The following steps are recommended:
Once the simulation model has been created with the desired components, such as the temperature control system, gating system, cavity, etc., define the mold opening time in the process parameters under "Cooling Settings" - "Ejection Timing After Mold Open". In addition, set the solver from "Standard" to "Enhanced" in the "Warp" menu item in the calculation parameters. Then select the correct analysis sequence (Ct F P Ct W) and, after starting the calculation, briefly look at the log file and check whether "Consider ejection timing after mold open" is set to "ON". After the calculation is finished, the results can be viewed - as usual - and gladly compared with a simulation without considering the heat transfer in the mold opening time. Good luck giving it a try.
Deeper insights are of interest!
Please contact us: + 49 (0)241-565 276-0 or send us an email to info@simpatec.com .
